Gold Header Ad
reserve your ad hereIn traditional industries when we talk about ‘breaking the glass ceiling’, we are referring to the under appreciation of women in the workplace and barriers to their career progression. In the marijuana garden however, it’s ALL about the females! The males are an unwanted intrusion into our gardening activities. However, they do have a purpose. Without males there would be no seeds and without seeds there would be no advances in cannabis cultivation.
This is perfectly illustrated by the autoflower phenomenon, which has revolutionised growing for the outdoor gardener in parts of the world where before growing cannabis successfully was a case of pot luck. Autoflowers have been specifically bred to flower based on their age rather than darkness/light ratio. This makes them ideally suited for growing outdoors in the northern hemisphere.
It takes approximately two years to develop an autoflower strain – backcrossing the genetics of the ruderalis with those of a regular variety of sativa or indica until the unwanted traits (such as low yield and bad taste) have been replaced. Amsterdam based PARADISE SEEDS was one of the first seed companies to see the advantages of the autoflower.
Since the early Noughties it has been continuously developing autoflower strains, such as Pandora, Vertigo, Auto Acid and Auto Wappa. Paradise Seeds varieties like these have been bred for at least 3 years and are 5th generation strains. In this article, Paradise Seeds explains a little about the origins of this autoflower and provides a 10 step guide to getting the best out of this unique plant.
Autoflower – The Background
The basis of the autoflower is the genetics of a curious hemp plant, cannabis ruderalis, that thrives in regions above 50 degrees north of the equator – from Poland, through central Russia and China.
Because of the inhospitable climate, this amazing plant has evolved to be small and bushy and develop a flowering cycle that is adapted to long days of light in the northern hemisphere summer.
For many years, its potential was dismissed because of its low THC content, but with advances in breeding techniques it became possible to cross the ruderalis with more potent genetics. This has produced a new generation of autoflowering cannabis plants that offer an increased THC content and yield offering a viable solution for growers.
Now, back to that appreciation!… While they are not for everybody, autoflowers are ideal for:
- Beginners – The Ruderalis genes makes these plants more resistant to disease and mould
- Speed – They grow fast and flower quick. Ideal for the impatient grower!
- Quality – With the kind of good genetics Paradise Seeds provides expect a good smoke
- Self Sufficiency – Ideal if you are more interested in a personal than commercial crop
- Space Restriction – Their size makes them perfect for small gardens and balconies
- Nosey Neighbors – their size also makes them easy to camouflage!
- Northern Summers – Let’s face it, before autoflowers, growing in the northern hemisphere was a real drag. Rejoice! Autoflowers have brought us northerners a weed to call our own!
At Paradise Seeds we were one of the first companies to bring autoflowering strains to the market and we have been working on ways to improve quality and yield with each new generation. With flowering times of 60-75 days inside and 65 to 80 days outside, we have plants to cater for all tastes!
From sweet sativas like our Auto Jack (Jack Herer/White Widow cross) and Auto Acid (a paradise take on the Diesel strain) to the compact Indica power of Pandora (in the tradition of Afghan and Sensi Star) and Auto White Berry (fast from start to finish) and the medical qualities of vertigo (resinous and ready in 60 days), there is an auto in our collection with your name on it! Check the website www.paradise-seeds.com.
To make the most of your Paradise Seeds auto flowering varieties, we have prepared a 10 step program designed to help you optimize your growth and achieve the best from your harvests.
Read on, learn, enjoy!
1: Planting Your Autoflowers – Get the Timing Right
The beauty of autoflowering cannabis plants is that they will begin to flower after 2-3 weeks and will be ready for harvesting after 10 to 12 weeks. This means that the outdoor gardener has the potential for two, or even three, crops in the course of one year.
As every gardener will tell you, getting your timing right is very important. Our basic guideline is:
- Plant outside between May 1st and July 1st
- Harvest outside from the end of July to the end of September
We recommend germinating your seeds at the beginning of May and planting them outside in the middle of the month (May 15th). This coincides with the change to ‘late spring’ (called Isjhelligen in Holland) – traditionally noted by gardeners as the date when night frosts have passed.
If you plant too early, your harvests are likely to be premature and smaller. By following our guidelines, your autoflowering plants will benefit from as much natural light as possible.
2: Give Your Autoflowers a Good Start in Life
When your Paradise Seeds package of cannabis seeds arrives, make sure you store them right. Yes, they are sealed, but like any seed they do not like fluctuations in temperature or high humidity. Ideally, store them in a fridge or a cool drawer or cupboard.
When you are ready to germinate follow our advice and tips for best results (using soil and hydroponic systems) which can be found on our website.
3: Provide Your Autoflowers with Good Hygrometric Conditions
We recommend that you plant your cannabis seed into the pot it will spend the rest of its life in. We suggest using a 4-10 litre pot. Fill it with good quality soil.
Because the mineral content of this soil will burn your root if exposed too early, make a small hole (1 knuckle deep) and fill with seed/seedling soil . Place your seed in this and cover with a plastic dome to create a micro climate that encourages the seed to grow.
The simplest solution is to cut a plastic bottle in half. Use the half with the lid. Remove the lid and place the dome over the seed. This is ideal for letting the seed grow in the first few days, inside or outside. Once the first leaves are showing, remove it.
4 Provide Autoflowers with the Best Growing Medium Possible
No way to cut corners here! Your harvest is directly linked to the quality of genetics, grow medium, and environmental conditions and, to a lesser degree, the quality of nutrients.
Your growing medium should be airy to ensure good drainage as well as water retention. The ideal PH should be between 5.8 – 6.5. There are many good quality soils available from nurseries, plant and grow shops. There is little to choose between them, although organic is recommended – remember, what you are planting in you are taking out of!
You can also search the web for soil recipes. You can also add elements such as coco, clay pellets or perlite to increase the airiness of the soil and give those roots some space to grow.
5: Watering Your Autoflowers: Less is More
One of the most damaging things you can do to your plant is over water. The roots will become suffocated and your plant will be unable to draw nutrients to the plant. A common mistake a beginner makes is to over water. If a cannabis plant is over watered then its growth will be stunted. Often a beginner will take this as a sign that the plant is not growing… and give it more water and nutrients (which is a bit like holding a drowning man under the water some more!)
One solution is to weigh your plant with its pot dry (after repotting for example), then add 5 to 10 percent weight in water to give you a reference. Some soft pot manufacturers suggest watering the plants with 20% of the volume of the pot (for example, an 11 litre pot needs 2.2 litres every watering).
If you do not trust your watering technique, perhaps research systems that self-water or monitor the humidity in the soil (such as Autopot or Blumat).
Note: It is important is your roots have period of relative dryness, before getting a new watering – the tap root will follow the water level down and spread its roots as a result.
6: Feeding Your Autoflowers: A Light Snack, Not a Heavy Meal
An autoflowering cannabis seed will produce a plant that is smaller and more compact. As a result the roots are lighter and more fragile than those found on their regular or feminized cousins. For this reason, don’t overfeed.
In a lively aerated medium (a soil with trichoderma, bacteria, and compost containing humic and fulvic acids) the plants shouldn’t need any nutrients for at least 3 weeks.
You may want to enhance root production in the early days and there are plenty of booster products on the market to do this. You should follow instructions on the packet carefully.
If you have a garden, a compost brew juice, aerated for 24 hours, will give your plants a good boost, while spraying them with neem oil will always be beneficial to the plant.
7: Pinching and Scrogging Your Autoflowers – To Do or Not To Do?
You may have heard of these terms which are often used to encourage growth and increase yield.
- Pinching – This process of pruning encourages bushy growth. You pinch a plant to remove the main stem, so that it will grow two new stems below the pinch.
- Scrogging – This process trains your plants to grow through a wire screen. The tops rise 3-4 inches above the screen and the rest of the plant is encouraged to bush out below it.
It is debatable about whether these techniques will make a significant difference to the yields of your cannabis plants due to the short lifecycle of an autoflowering plant. Beginners should avoid these techniques and just let the plant follow its own way.
However, if you do want to pursue this route you should avoid pinching and scrogging too late into the flowering stage, and avoid altogether with early flowering plants or those that had a slow start to their growth.
For plants that have longer flowering time it is always possible to pinch, using the Less Stressful Technique (LST). Because the autoflowers have a limited lifespan they will recover badly from stressful conditions that are overly stressful.
8: Harvest Your Autoflowers Sequentially… and Wait a Little Longer if Needed
One thing you will notice with autoflowers is that the main tops become ready for harvest before the lower branches. Often the top buds will look like the picture on the packet, while the trichomes on the lower buds will have only just started to turn. This is normal!
At this point in the grow, monitor your plants carefully if you are growing outdoors, as environmental factors can come into effect – from heat and cold damage to the growing of mould.
If possible, harvest the top buds and wait another 6-10 days for the buds on the lower branches to reach their full potential. Waiting this little bit longer will result in added weight, quality and potency. Above all, be patient! Don’t be too hasty to harvest.
A rule of thumb is that autos take an extra week of flowering outdoors and the harvest times given on the seed packets are a guideline but not the gospel. There are many different factors that will affect the growing of your plants – nature is a wonderful … but unpredictable thing.
For example a first spring grow will lengthen the plant maturation because the sun hours are still increasing and the plant will feel it. If you plant after the solstice you will notice a shorter flowering time by a week or two.
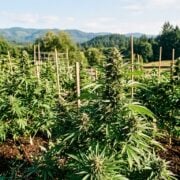
With autoflowering varieties you can expect a first harvest of good buds in the middle of summer and up to 3 harvests a year in a greenhouse at 50° latitude North.
9: Grow Organic and Improve the Quality of Your Harvest.
Organic growing promotes micro life (bacteria and trichoderma) that stimulates the digestion process, and makes natural nutrients available to the plant.
This will mean the plant will encounter less risk of over fertilization, and the final product will burn a lot smoother than if overdosed with mineral nutrients. A good week of flushing with PH stabilized water, enzymes or a diluted compost juice will aid this process even more.
By combining a good premixed soil with organic nutrients containing extracts of seaweed, guano, molasses, cane sugar extracts, coconut juice, worm compost, your plant has the best life it can get – from start to finish – and you will notice the results.
10: Get Organized with Your Next Autoflower Grow
Autoflowering cannabis plants allow you to harvest at least twice outdoors at 50° North (including parts of the US, Canada, Japan, Belgium, France, Germany, Czech Republic).
If we return to our basic guidelines, you will see that with a little bit of planning you can stagger the sowing of your cannabis seeds to produce more harvests:
- Plant outside between May 1st and July 1st
- Harvest outside from the end of July to the end of September
With a greenhouse it is even possible to get a third harvest – the extra protection allowing the planting of seeds in August and a harvest in late October/early November before the winter frosts come. For those living in the south of Europe – parts of France, Spain and Italy, there is even the possibility for a fourth harvest!…
Of course, harvesting later in the year brings its own problems – notably mould – but a well-ventilated greenhouse should help.
We hope these tips have been useful. Please do check our website for more tips and information on what seeds suit your circumstances. Paradise Seeds wishes you a most excellent grow and a bountiful harvest!